

This project was the first one Mr. Matrimony and I did together that I hoped someday to have on a blog. Again, I wasn’t sure of how the whole bloggie thingie worked, so I don’t have the greatest pictures of the step-by-step. The ones I do have were put together on Photo Grid. I had to go back and “un-grid” them to show them singly. The result is less than perfect. Like MUCH less than perfect. The “during” pictures are fuzzy from being re-gridded, unfocused, and taken with a shoddy camera. However, to me, it’s amazing I have anything at all to work with! As I’ve warned you before, if you are looking for perfection, you’re on the wrong blog!
Come to my blog for inspiration and pointers.
I’m ADHD, not OCD
(or any other letters of the alphabet.)
Speaking of inspiration, here is mine for this project…

I found this idea on Pinterest. I do not know who the original Pinner is. When I went to find out, the Pin was just plastered all over Pinterest. It’s a very popular Pin! So, if you know who the original Pinner is, please let me know and I will give them credit.
For us, here’s how this particular venture in repurposing began…
Mr. Matrimony was getting ready to light the bonfire burn-pile.
It.
Was.
HUGE.
Like, giNORmous!
Right when I happened to look over, he was holding a perfectly good broken chair seat and getting ready to toss it on top of the pile. The BURN pile! Really… who does that???
I yelled, “WAIT!”
Surprised, he looked at me and said, “What?”
I told him not to throw that perfectly good broken chair seat away.
He said, “Sweetie… we are not saving junk.”
I said, “It isn’t junk…. Sweetie. It’s the beginning of a chair swing we’re going to make for my blog.”
He flatly replied, “First, you don’t have a blog. Second, I’m not building a swing. Third, you don’t have a blog.”
I quickly responded, “First, I will. Second, YOU aren’t. WE are. And third, I will.”
He just shook his head, handed me the chair part, and mumbled something about how he knew he was going to be roped into making a swing.
Well, let me just say right now…
1) I have a blog.
2) WE did make a swing… together.
3) I HAVE A BLOG
To his surprise (and mine!), Mr. Matrimony actually had a good time helping me. He was able to teach me a few things he knew about carpentry, help me set up props for pictures, and he liked the finished project. We both had fun and agreed we would do more projects together. He even bought me a camera for Christmas to encourage me with my blog!
Mr. Matrimony really is the best

Alrighty. Here’s what you’ll need.
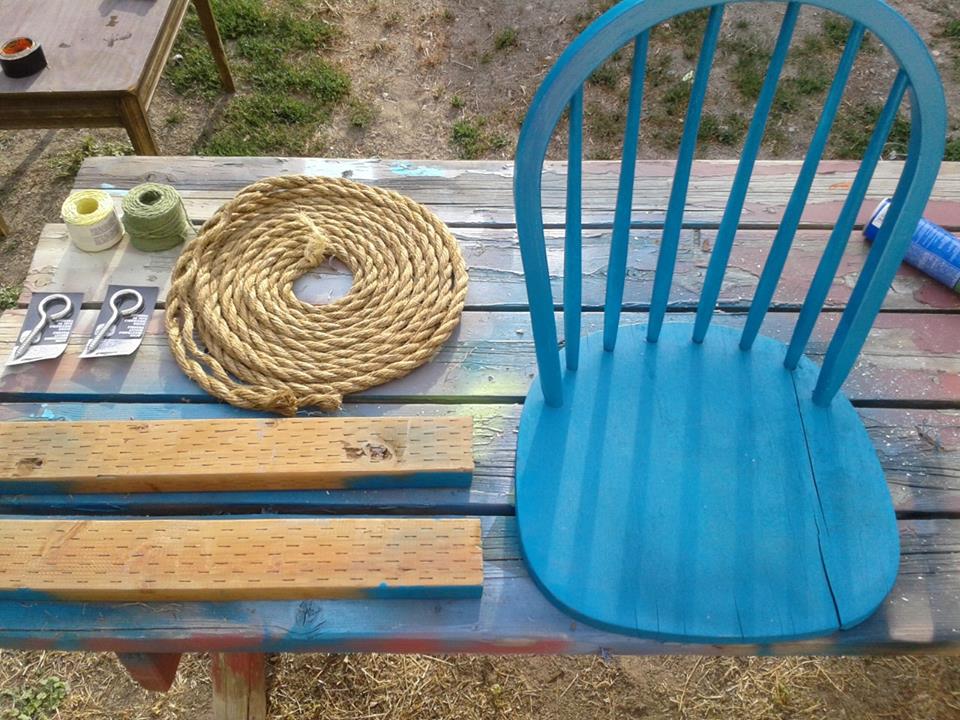
Tools~
-
Drill with a big ol’ bit for a big ol’ rope
- Screws
- I don’t remember everything we used (it was last summer), but I’m sure you can gather things as you go along. I did *smile*
Materials~
- Chair seat (You can use most any kind, I reckon. They are everywhere!)
-
Two 2×4 pieces of lumber that are 4 inches longer than the widest part of the chair seat. We got lucky and found a cull piece that had been treated for outdoor use. If you will be using your swing out in the elements, I’d say pre-treated would be a must. Ours will be hanging under a roof, so I’d feel safe using untreated 2x4s that have been painted.
- Wood glue
- Spray paint (and primer, if you want to use it)
- Twine ~ I used green hemp, and some sort of yellow nylon-ish stuff. This is just for looks, so strength is not a factor. Use it to wrap around the rope when you’re done tying the knots.
- Screws for attaching the chair seat to the 2x4s
- Two super heavy duty “eye” bolts. If you aren’t sure of what size to get, ask a pro at the store. (These aren’t needed if you are wrapping your rope around whatever you are hanging it from, ie: tree limb)
- VERY THICK rope (This part is expensive… We spent about 25 bucks on ours!) At the hardware store we bought ours at, there was a guide next to each size of rope that told how much weight it holds per foot. Also, we needed enough to loop around itself at the top, for the knot. Mr. Matrimony did the math. Here’s what I think of math…

I know…. SQUIRREL!
(But super funny squirrel, huh???)
The first thing to do is CLEAN that chair! Almost all perfectly good broken chairs have not been treated as such. They’ve most likely been tossed out on the side of the road, forgotten in the basement, or found in a gully (I don’t know why, I ran out of places). That kind of treatment will make a perfectly good broken chair dirty. So clean it. This is not a part I skimp on. I once bought a birdcage for .08 cents at the auction (it was with a pile of junk I got for a few bucks and that was the average). The birdcage was SO cute and I had a plethora of ideas for it. Before I knew what I was doing, I was spray painting it! Mind you, in “cleaning” it, I’d only gone over it with a rag for a brief moment. When I was done painting the birdcage, I proudly hung it up in the window. A little while later, I was walking by, and something (actually, a bunch of somethings) moving in the light caught my eye. It was hair.
Cat hair.
A LOT of cat hair.
*smh* (shaking my head)
Nowwwww, I know why they didn’t need the birdcage anymore!
So, I learned the lesson of cleaning things (including sanding when needed) before I begin painting.
So clean that chair!
And sand it. Have you ever hand a big ol’ splinter in your bum cheek? No? Neither have I, but once (in middle school) in fun, I pushed my friend Susan over on the bench in PE, so I could sit next to her and she fell on the floor SCA-REAM-ING! She hand a 3 inch (I kid you not) splinter in her bum cheek.
OUCH.
Sand that chair, okay?
Now Paint. You may even want to paint your chair when you’re finished assembling it, cause it undoubtedly will need touch-up paint from getting moved around so much…. ours did! I chose to paint my first AND do touch-up because it’s hard to get paint in every little crevice after I’ve assembled pieces, such as the support boards. As you can see, I didn’t paint the part of the wood that connects to the chair, because I’m cheap. Everything else, I painted. When a person is actually swinging at most any height, the bottom of the chair can be seen. Oh, and I didn’t use primer. I am probably going to change my color scheme (cause that’s what I do) so why bother? Because, you might say, it makes the paint go on more evenly! No argument here. Again, I’m just cheap. By all means, do things the right way. I did mine the right now way.

When the paint is dry (like really dry, not ADHD dry), turn the chair upside-down, and lay the boards on the bottom of the seat (which is now the top?) where you want them and mark the edges, so you can apply the glue to the bottom of the chair. Put the boards on the glue and screw them in place. Pre-measure your screws so the first person to sit down does not get the point. Do You? lol… (that was Mr. Matrimony’s joke. Funny boy)
Don’t skimp on the glue!
A Carpenter friend of Mr. Matrimony once told him that the screws or nails are only used to hold materials together until the glue dries. The glue will be stronger than the wood when it is dry.
A note while we are on the topic of glue… If you look closely at the back of our chair, where it connects to the seat, you can see a little teeny tiny bit of natural wood. With use, the chair has started to separate. We are going to add more glue to the holes the dowels go in by using a syringe. Please use common sense! If your chair isn’t sturdy, make it so! If you can’t, don’t use it for people to sit in… swing, or otherwise!


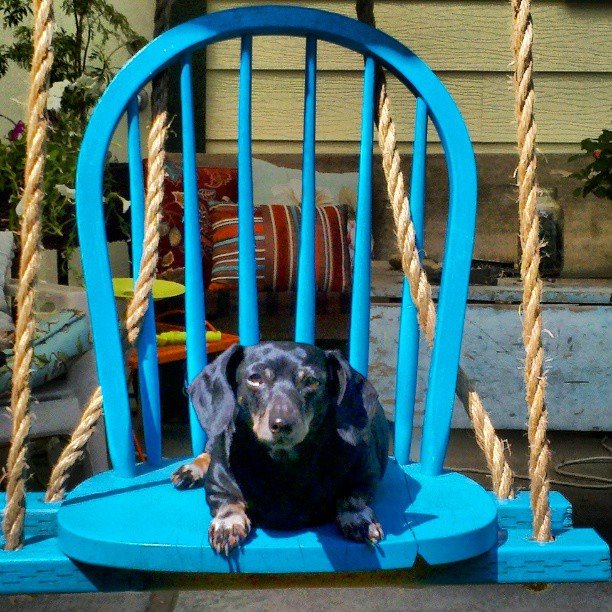
Weaving the rope…
You may want to use a different method of weaving your rope through your chair. If yours has arms, you might thread the rope through them. With ours, we centered the holes between the sides of the chair and the end of the boards. Mr. Matrimony did say that the way the inspiration chair was “roped” may not work if someone leans back. He thought weaving the rope through the back of the chair would be sturdy. If you don’t think your chair is sturdy, don’t use it as a swing! Before you even sit in it, make sure it’s strong enough for human use. To leave the most possible strength we could in the rope, we used one continuous piece. It took a couple of tries to get it “just so”, but when it was finished, we felt it was safe.

When I sit in our chair, it does feel very sturdy. I can actually swing in it! It’s great!!!

Mr. Matrimony used a “Fisherman’s Knot” for our swing. He thinks it’s the best because as the knots pull on each other, they add strength to both knots, from both ends of the rope. You might want to search the internet to find which knot will be best for where your chair will be. If you are tying it around a tree limb, for instance, you may want a different type of knot. I would ask someone at the hardware store. They really are a wealth of information.
You should know…
When I write out my directions, I’m not the most technical thinking person. What you read, and even what you see in my pictures may not make any sense at all! My point is, if I can do it, YOU CAN TOO!!! Just give it a go! Don’t let lack of expertize hold you back. What’s the worst that will happen? You’ll have a really cute chair swing no one can sit in? Fine! Make this one a planter and start over. Just give it a go. Be BOLD!
The hardest part about crafting is starting.
How many Pinterest Boards are you going to fill up with ideas before you actually DO them? I even started a board I titled, “Pinterest Ideas I Actually Did!” I challenge you to start one too. Please share with me when you do!
