
d.i.y. Plate Rack
 My friend, The Pink Nurse, asked me to do a tutorial on my plate rack. I was like, um, uh… ok?
For reals.
I’m actually a little embarrassed that when she finds out what it’s made from, she’s gonna be like, um, uh… ok? lol…
For reals!
Why? Because of what I made it out of. This….

I know, right???
It’s one of those, “I want it right now” things. Mr. Matrimony said he would make a fance dancy plate rack for me. You know the kind, with the dowels. Well, it hasn’t happened yet, so I decided I would do it myself. My mama says my first word wasn’t a word. It was a paragraph. And it started with, “I do it my TELF!” Somehow I wasn’t surprised. Neither is anyone who knows me. Anyways, I wanted the plate rack NOW. So I made one….
I don’t have pictures of the how-to, but I think it’s pretty self-explanatory. I started by taking the screws out that are at the “hinge” places. You’ll be left with 3 pieces. The smallest piece (the part the cups are sitting on in the picture above), the medium size one (the part above the cups), and the large piece (the part the cups are leaning against and is half of what the plates are sitting on). The smallest piece will not be used for this project. Save it for another project. You can buy these racks without a shelf for the cups, but that isn’t what I had on hand.
Next, carefully remove every-other slat. As they are, they’re too close for plates to fit between them. Do this with the largest piece and the medium-sized one. Once you are done with this step, paint both of those pieces, plus one removed long slat.
When the paint is dry, the pieces are ready to be assembled in your cabinet. I am not sure about measuring or anything on this. I just kept trying until it was at the correct angle for my plates. My son helped me by holding the rack in various positions while I slid a plate into it and made sure it fit. I also made certain the plate was easily removed. Once I found that position, I placed the single board in front of the bottom part of the large piece. Then, I nailed it into place (you can use screws if you wish). Now, my son held the plate for me while I slid the medium-sized piece under it to find the position it needed to be in. This part is integral. Without it, the plates won’t stand up-right. They’ll just fall right over! When you’ve found the perfect place for the now bottom piece to sit in your cabinet, nail or screw it in place. It would most likely be best to drill holes first. I didn’t, but I think I got lucky with those tiny pieces of wood not splitting.
Now, simply put the large piece in place. I didn’t attach mine to the cabinet. That’s why I have the slat across the bottom. It keeps the large piece from moving. I also wanted to be able to remove it from the cabinet to clean.
Oh… that’s a good one! Clean…. lol
Seriously, I didn’t attach it, because I don’t know how!
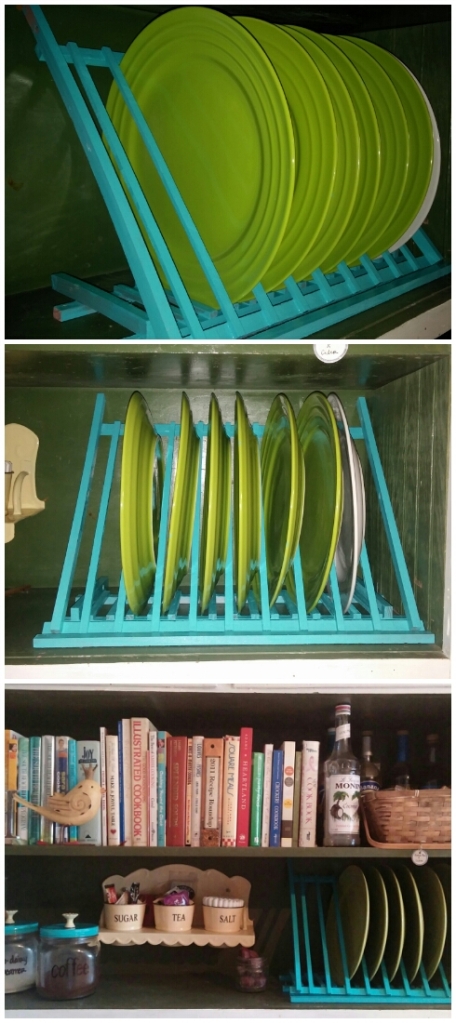
Here’s a look at my finished product….

And here’s what it looks like in my cabinet, with the other stuff I have in there….

Pretty sweet, huh? I really like how it turned out, perfect or not, even if it was more not than it was perfect!
As I typed out this blog, the more I wrote about the project, the more I was a little embarrassed. I know most crafty people out there can do such a better job at this than myself. Mr. Matrimony could do WAY better than this. Here’s the problem though… I wanted it NOW!
I’ll make sure to show you a full how-to when he gets one made RIGHT. It just won’t be right now…
On Friday evenings I enjoy The Weekend Wind-Down Party at http://dedivahdeals.com/2014/04/04/weekend-wind-party-2/
There are so many great ideas there! Please take a few moments to check it out.
Thanks!

March 25, 2014 at 4:24 am
let him make one in his own cabinet, it like it way you did it
April 4, 2014 at 7:51 pm
Wow, this is great, I like it better that it’s not perfect if it was supposed to be perfect but in any case you did an excellent job! I understand not being the patient one…
April 6, 2014 at 5:03 pm
Thank you so much! I think there is nothing in my kitchen that is perfect. Ironically, that makes it a perfect match!
November 24, 2015 at 9:29 am
I really like the idea. I was looking for something simple since I also have an ‘ex’ Mr.Matrimony who does excellent work but not for me. I just took the door off a cabinet in my new (old) house and this would be perfect for me!